YouTube video notes for:
How to Use LayOut for SketchUp Pro (2024)
These are the full notes for our video — every tip, screenshot and step, right on this page.
Download these notes as a PDF#1 How LayOut & SketchUp work together
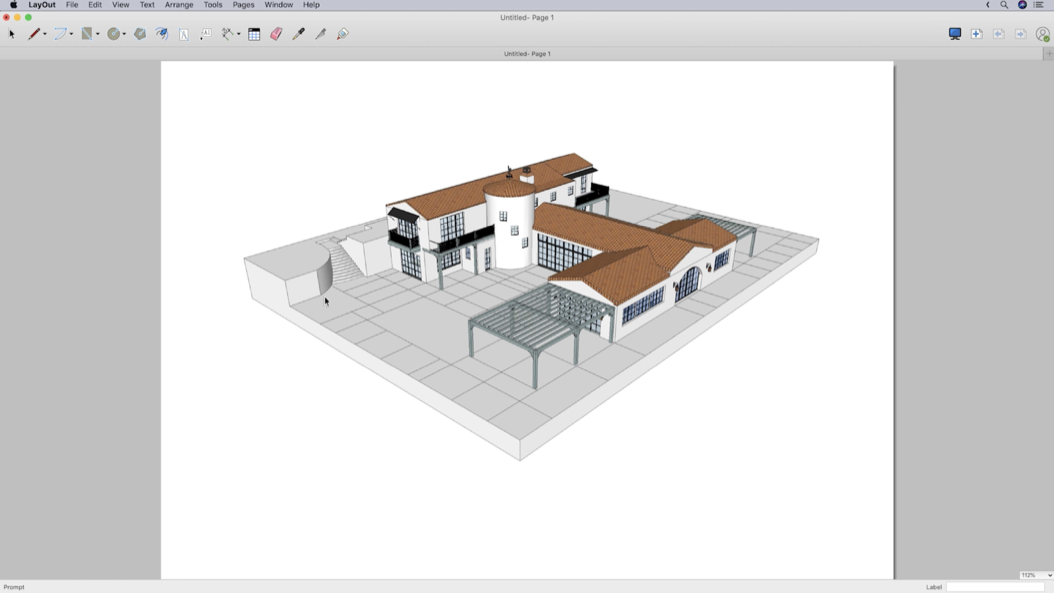
You should draw your 2D or 3D design in SketchUp first, then send it to LayOut to document the design.
LayOut is a standalone program that is bundled with SketchUp Pro. In LayOut, you take your 3D SketchUp model and create all the 2D documents that you’d previously have needed a drafting program like AutoCAD to create. It even allows you to create presentation documents similar to programs like Adobe Illustrator or InDesign.
So you start with a SketchUp model, then in SketchUp under the File Menu you pick the option for Send to LayOut. LayOut will launch and you’ll be asked to pick a template which includes your paper size, whether you can see gridlines or not, and whether you want to start with a title block. In LayOut you set up a “Viewport,” which allows you to reference a view of your SketchUp model directly in LayOut. Then, you use LayOut’s documentation tools to add things like dimensions, labels and text.
#2 Create Scenes before Viewports
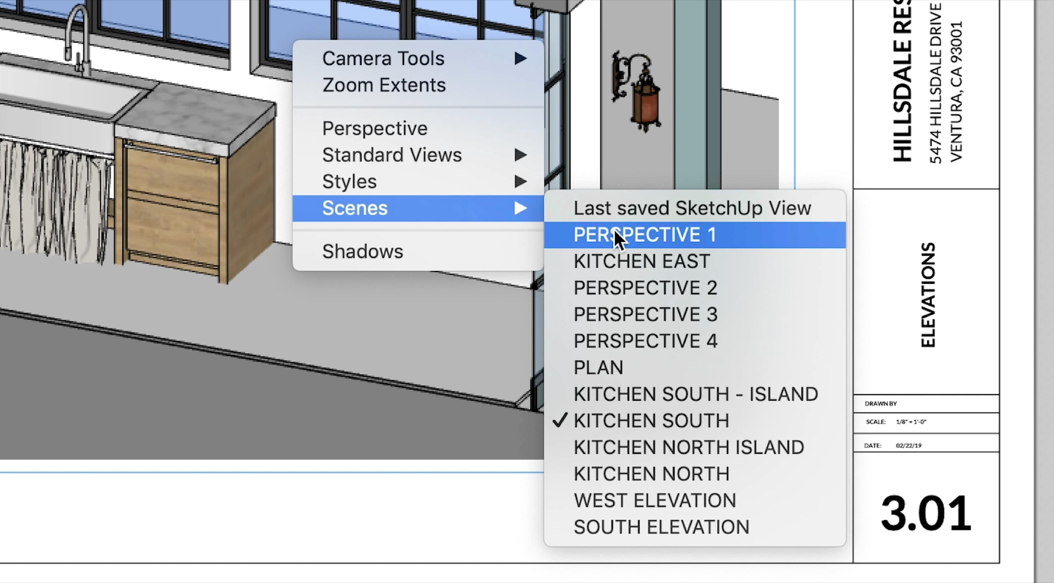
Before you send your SketchUp model to LayOut, be sure to create Scenes first in SketchUp.
Once you’ve sent your SketchUp model to LayOut, you’ll be tempted to begin documenting your design. But here’s the problem: Seemingly out of nowhere, LayOut will switch what you see in your Viewport, messing up all of your annotations in the process. As it turns out, LayOut is just doing its job and showing you your Last Saved SketchUp View. Which means if you go back to work on your SketchUp file and save it, the Viewport in LayOut will automatically update.
To prevent this from happening, you first need to set up Scenes in SketchUp that represent the exact views you’ll want to see in your LayOut Viewports later. Then, in LayOut, right click on your Viewport to assign it the appropriate SketchUp Scene. Now, design changes in SketchUp will automatically carry over to LayOut without messing up the views you need!
#3 Get the right Camera views
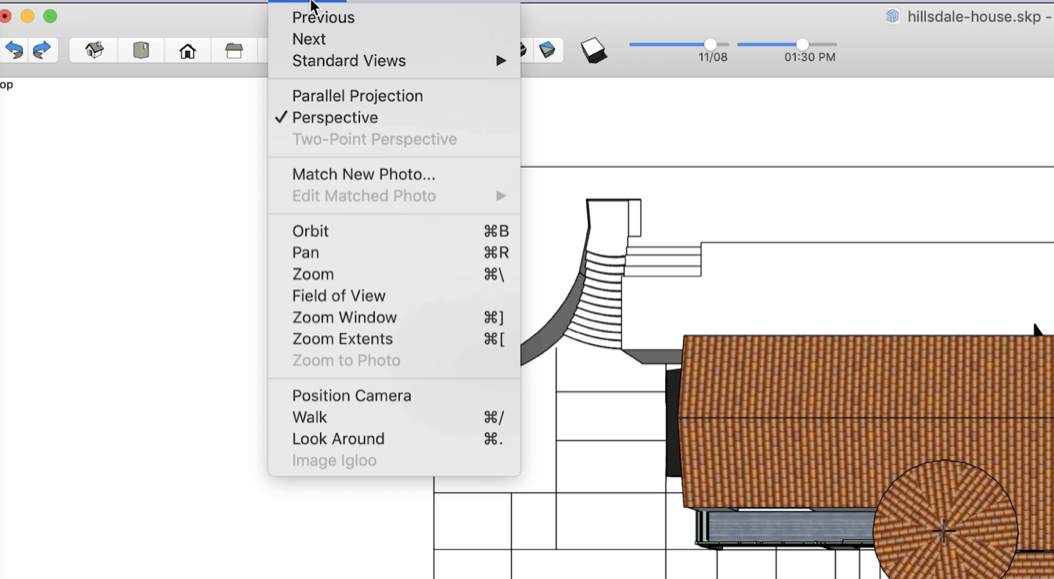
To get the plan, elevation or perspective views you want later in LayOut, you’ll need to use the Camera menu in SketchUp.
Let’s say you want to set-up a plan view in SketchUp. Trying to do that using the regular Navigation tools is not only frustrating, it’s impossible. So what’s the right way to do it? The answer lies in your Camera menu. There, you can jump directly to a Top Down view without having to try to orbit to one manually.
Now by default, your SketchUp camera will be in Perspective mode. To get a more traditional 2D plan view, under the Camera menu, click on Parallel Projection, which will give you an axonometric view with perspective turned off. Then, you can use Pan and Zoom to frame your view - this will be the same framing you’ll see in your LayOut Viewport later. Once you’ve framed your view, be sure to save your Scene. But wait — this isn’t quite a floor plan view just yet. That’s where the next tip comes into play…
#4 Give Active Section Cuts their own Scene
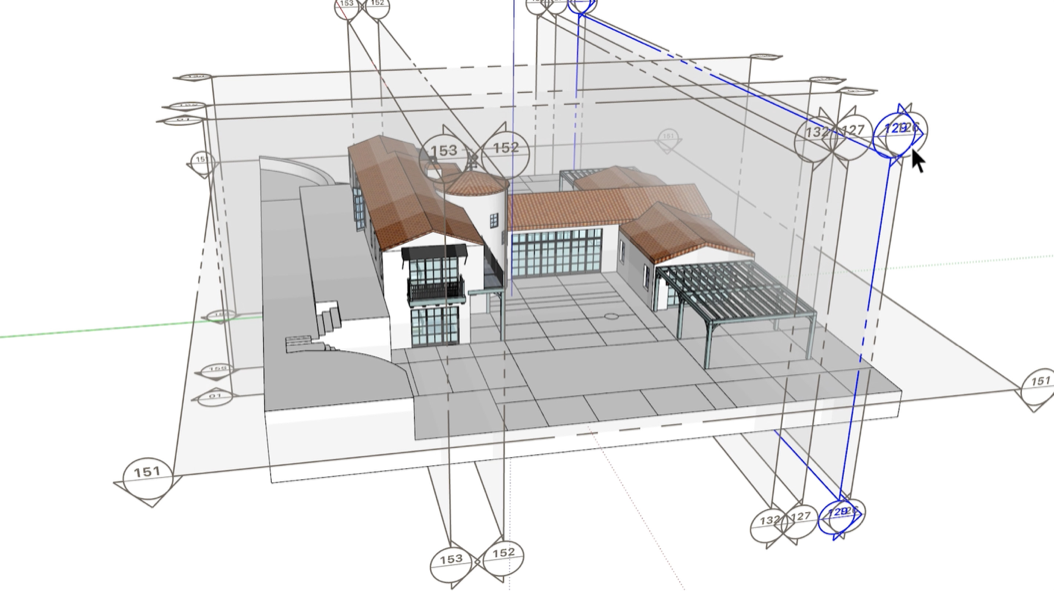
For each Section Cut, make it the Active Cut and then create a Scene for greater control between section cuts.
Whether you need to show a floor plan, or a cross section, you’ll need to add a Section Cut to your SketchUp model. But here’s the problem: Once you add a Section Cut, it’s tricky to get it to show up when you need it and disappear when you don’t. So how do you avoid this?
To get to the answer, let’s talk about best practices for setting up a Section Cut: When you add a Section Cut, it will be the Active Cut. To get a view perpendicular to the cut, Right-click on the Section Plane and Align your View to that plane. And be sure to hide the Plane if you no longer need to see it. Then, pan or zoom as needed and Save a new scene. If you create Scenes for your Section Cuts as you add them, you’ll make your life way easier later when you need to navigate between active cuts. Your future self will definitely thank you!
#5 Use Tags the right way
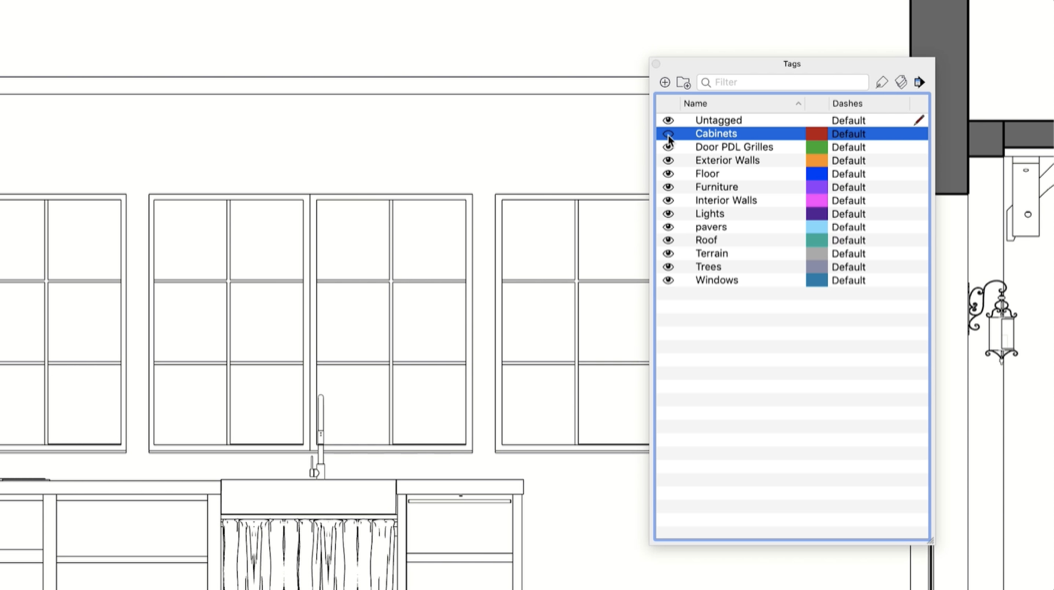
To hide or show certain design elements later in LayOut, you’ll need to assign Tags in SketchUp first.
When you’re in LayOut setting up your Viewports, you’re going to need SketchUp Scenes that show specific things in your model and hide everything else. To do that, you’ll need to organize your SketchUp model with Tags. Tags allow you to hide and show different elements in your model. By default, all the edges and faces you draw start off as Untagged.
As you create and assign new Tags in your model, here are 3 simple rules to follow: First, never, ever touch the Active Tag. It should always be Untagged. Second, make sure you only assign Tags that you’ve created to groups and components, and not to individual faces and edges. And third: Plan ahead in SketchUp and create Tags for the things you know you’ll need to hide or show later in LayOut.
#6 Control Line weights via Styles
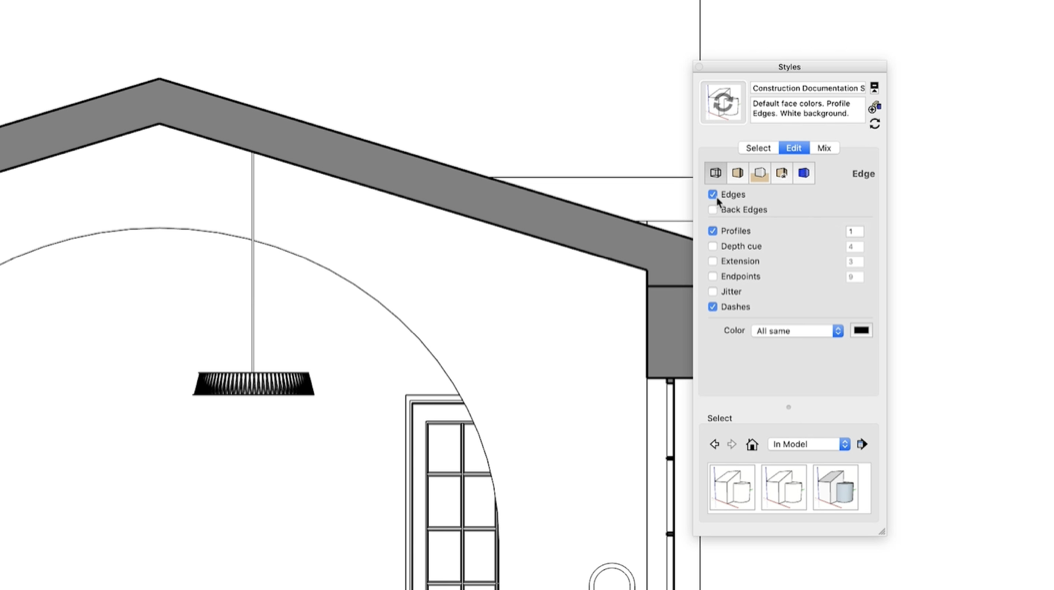
To control line weights in LayOut, you need to use the Styles menu in SketchUp, and consider stacking Viewports in LayOut.
So how do you control Line Weights? Well, the answer actually lies in SketchUp and not LayOut. In SketchUp, in the Styles window, you can set-up 3 different line weights: one for your Edges, one for Profiles and one for Section Cuts. The numerical values you assign to the thickness of the lines are ratios, so Edges have a built-in value of 1, and it’s up to you to decide whether the other line weights are 2x, 3x or however many times thicker you like.
Then in LayOut, you can further refine things by dialing all line weights up or down in thickness together. And if you need more than three line weights, you can stack more than one Viewport on top of another in LayOut! That means you can have as many line weights as you’d like.
#7 Draw Some 2D Symbols in SketchUp
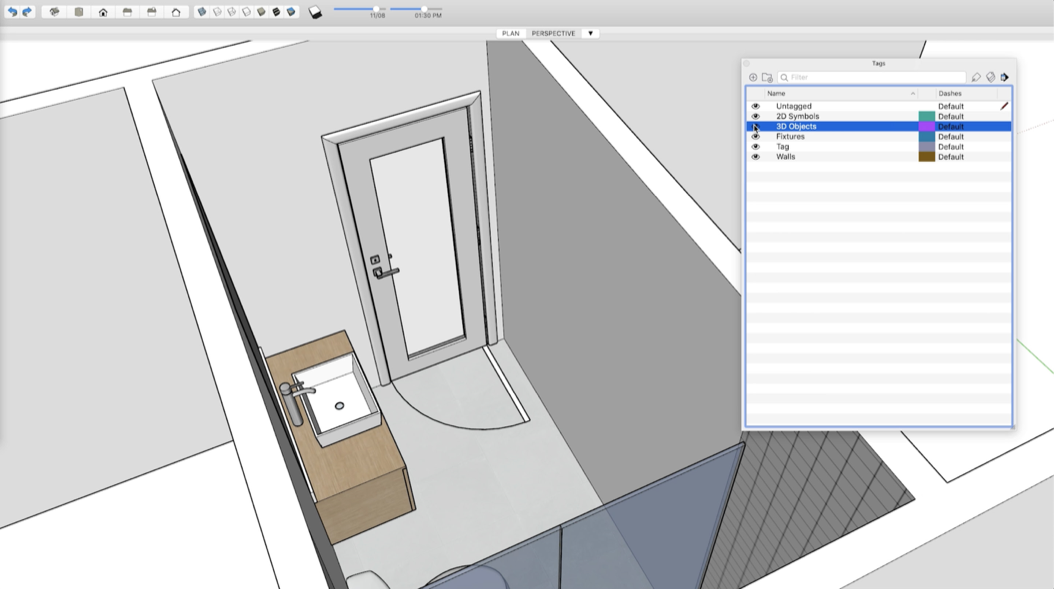
When you need 2D and 3D representations in your LayOut viewports, consider drawing both in SketchUp.
In LayOut, you’ll likely need to show 2D symbols that represent objects in your design, like door swings or furniture symbols. It’s best to draw your 2D symbols in SketchUp first and group them with their 3D counterparts. Then create separate Tags for 2D symbols and 3D objects — you can show only the 2D symbols when you need them, such as in a plan view, and hide them when you don’t, such as in a perspective view.
For any plan view Scenes, toggle on the 2D Symbols Tag so it’s visible and hide the 3D objects tag. And for perspectives and elevations, do the opposite, so only the 3D elements are visible. In LayOut, you’ll get the 2D symbols when you need them, and your drawings will remain accurate if you make changes to your design, like moving the placement of a door — since the 2D symbol will change places too.
BONUS Name Groups & Components
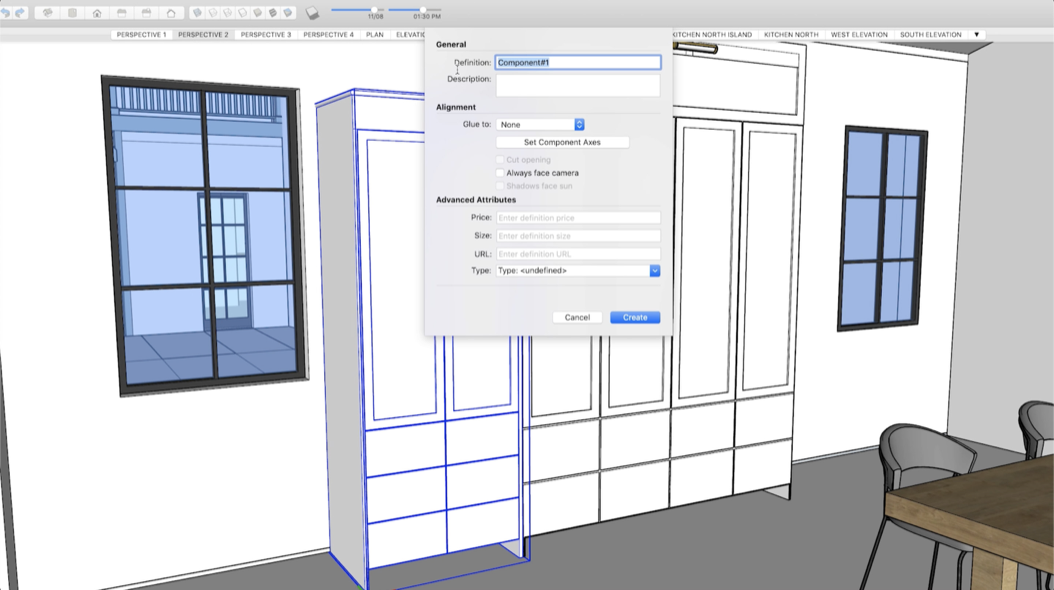
When it comes time to Label things in LayOut, it will automatically use the names of your Groups and Components.
In LayOut, you’ll use the Label tool to name things in your drawings. If you have lots of things to label, that can mean a lot of typing and plenty of chances to make mistakes.
So what’s a better way to do this? Back in SketchUp, when you make Groups and Components, take the time to name them properly. For Components, you name them when you make them. For Groups, you name them in the Entity Info window.
Then, when you’re working in LayOut, the Label tool will automatically display the name from SketchUp without you having to type it over and over again. This can be a huge timesaver!
YOUR NEXT STEPS
We hope our How to Use LayOut for SketchUp Pro video and these notes have gotten you started down the right path.
From here, it’s definitely possible to learn everything on your own. But if you don’t have the time to figure out what you need to know, and you can’t afford to pick up bad habits, we recommend checking out our Video Course Library.
It’s filled with $8700 worth of SketchUp training exclusively for professionals — including our Intro to LayOut courses.