YouTube video notes for:
The Secret to Better Renderings in V-Ray for SketchUp
These are the full notes for our video — every tip, screenshot and step, right on this page.
Download these notes as a PDF#1 Compose Your Shot
The first thing to do is use the virtual camera in V-Ray to set up your shot. This includes:
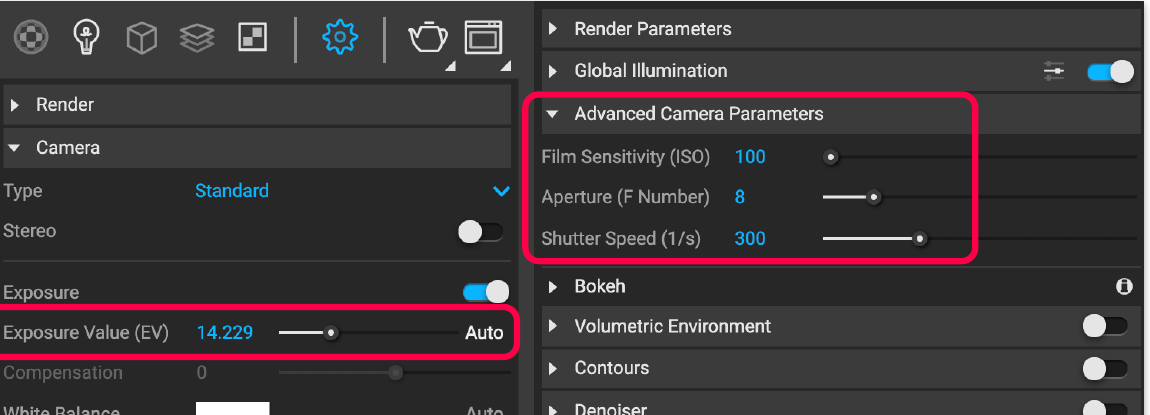
1) Exposure: You can have Auto Exposure turned on to have V-Ray take care of it for you, or can turn Auto Exposure off for more control over Exposure, Depth of Field, ISO, Aperture and Shutter Speed.
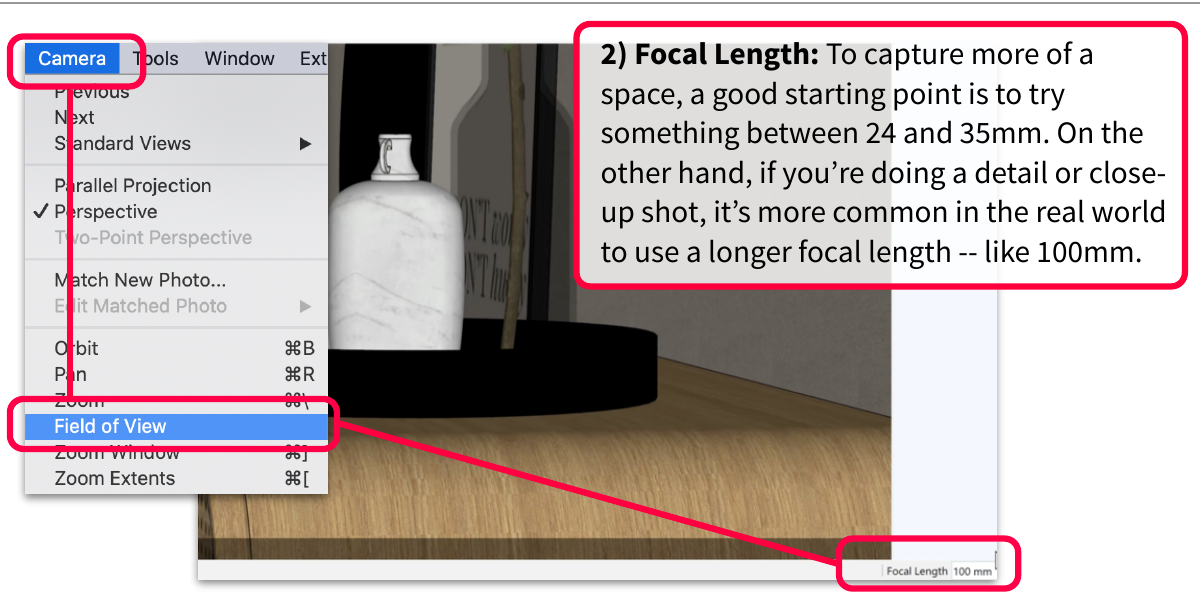
2) Focal Length: To capture more of a space, a good starting point is to try something between 24 and 35mm. On the other hand, if you’re doing a detail or close-up shot, it’s more common in the real world to use a longer focal length — like 100mm.
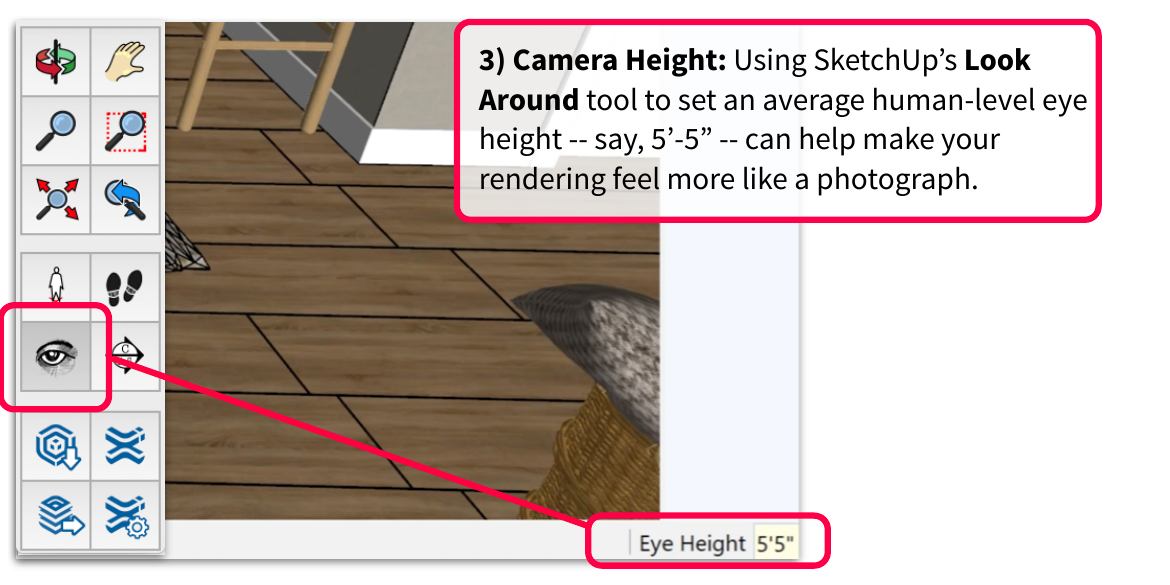
3) Camera Height: Using SketchUp’s Look Around tool to set an average human-level eye height — say, 5’-5” — can help make your rendering feel more like a photograph.
4) Rule of Thirds: Imagine your image is divided into a grid and place key objects at the intersection of the grid lines to give an overall balance to your compositions.
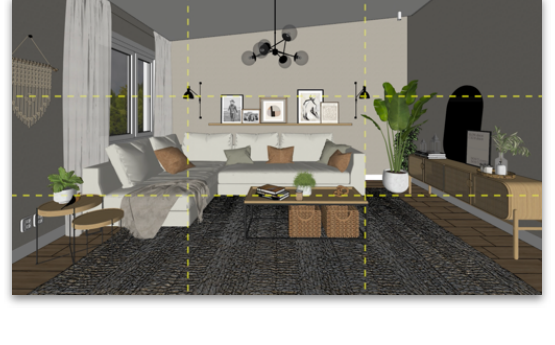
You can even add a grid in SketchUp by using the Watermark feature. Here’s how:
- Download the Rule of Thirds PNG we showed in the video.
- In the Styles window, pick the Edit tab and pick the Watermark icon
- Click the ⊕ icon and pick the Rule of Thirds PNG
- Set your Watermark to display as Overlay
- Set the Blend more towards the Background to make it transparent
- Stretch to fit entire window and uncheck Lock Aspect Ratio

5) Hide/Show Tags: To finalize exactly what you’re showing in your shot — and also hide elements that aren’t in the shot but may slow down your rendering.
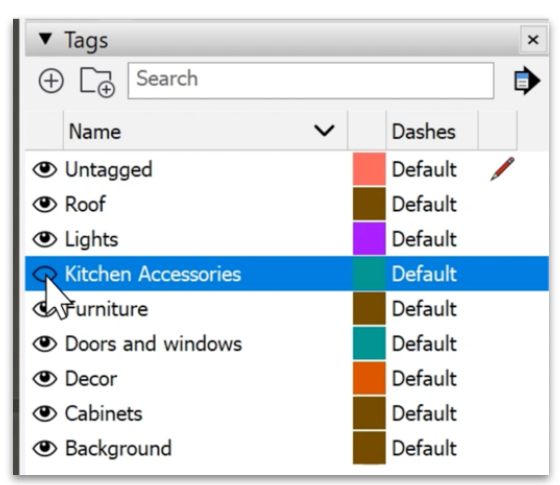
6) Save your Scene: This will lock-in everything you’ve done to compose your shot.
#2 Light Your Scene
The most common way to create a balanced, beautiful shot would be to use the 2-Point Lighting technique. Two Point Lighting is essentially just what it sounds like — you’re using two lights to light the focal point of your image.
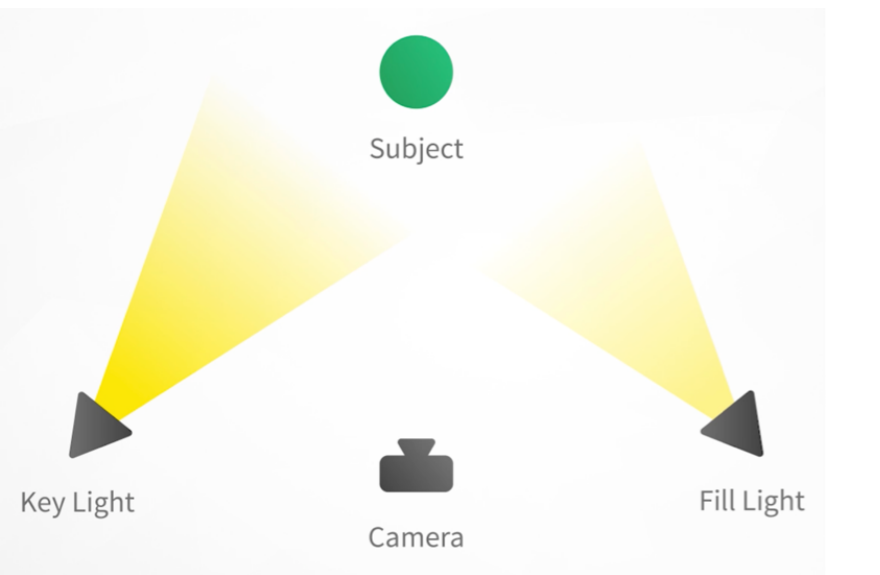
Here are the 5 steps for using the 2-Point Lighting technique:
1) Set Up a Key Light
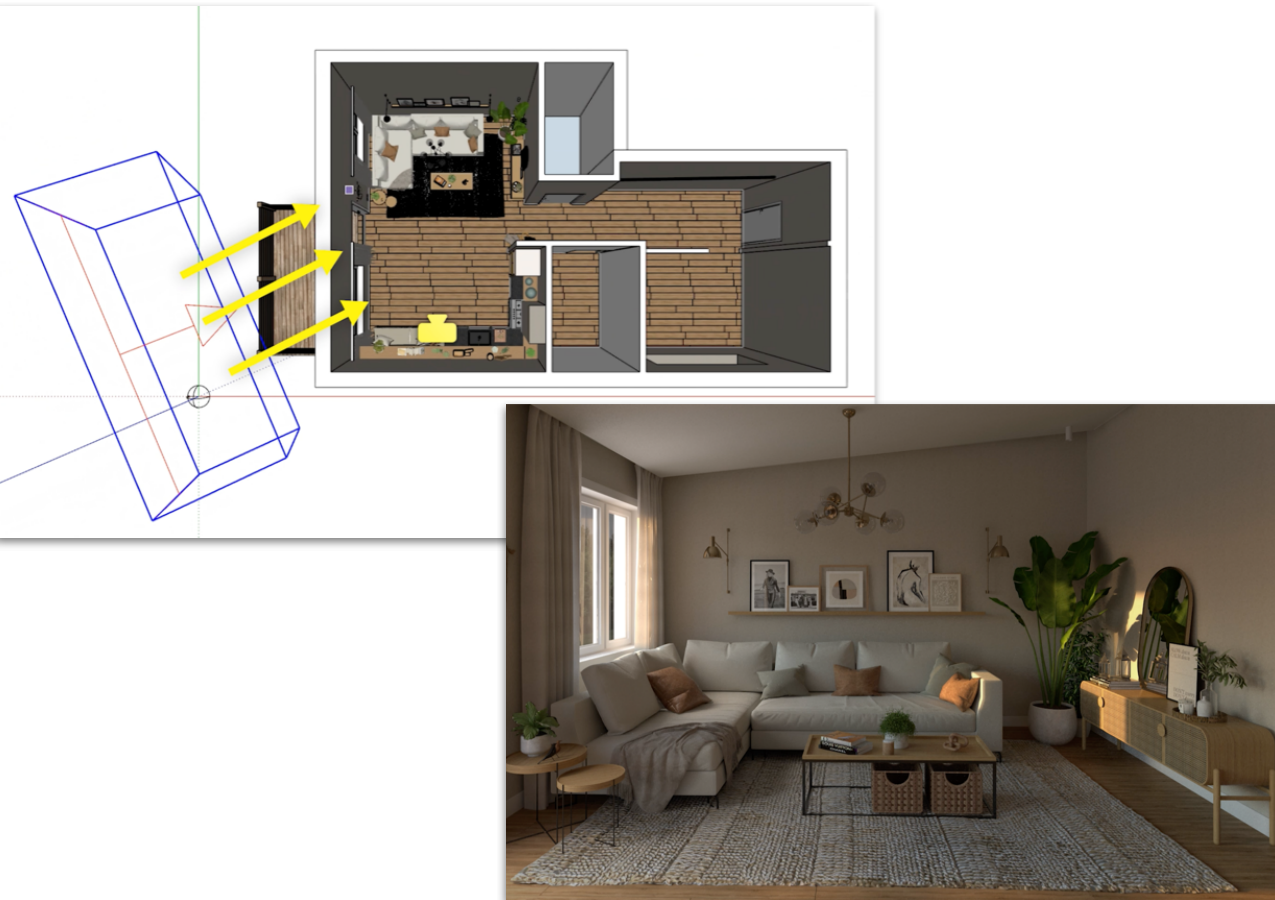
The Key light should provide the primary lighting and shadows that you want to see. You can use the Sun or a V-Ray Dome Light if you want sunshine to be the primary source of light in your rendering. Or, you can use an artificial light as your Key Light. If you want to go that route, usually a directional light like a Spotlight or Rectangle light is the best choice. As a general rule of thumb, it’s best if you position your Key light higher than the camera — then angled away from the camera and pointing towards your focal point to achieve the most natural looking results.
2) Balance Exposure to the Key Light
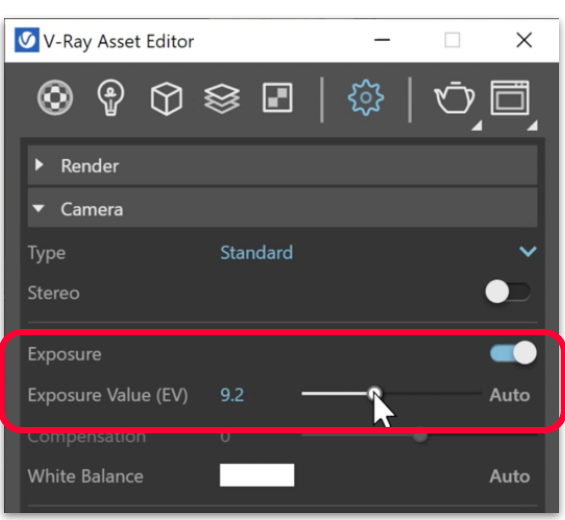
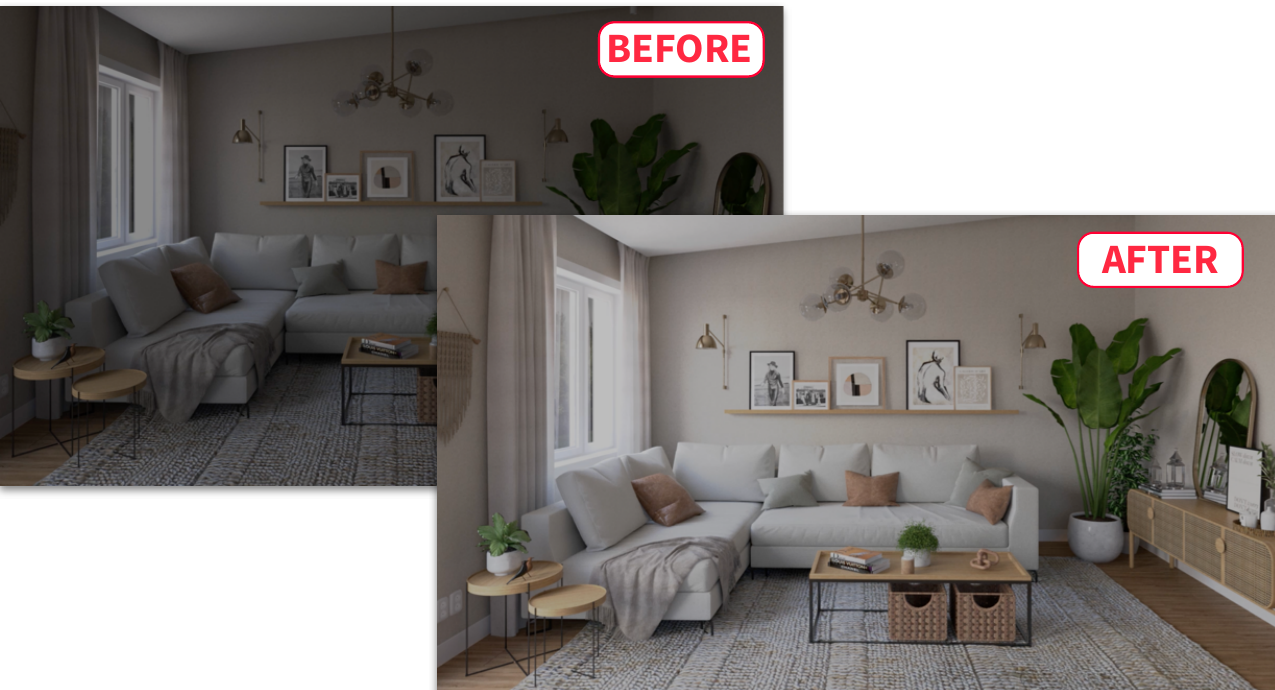
Just remember that you need to have Auto Exposure turned off, and then to increase the exposure — or make the image brighter — move the slider to the right, or to make the image darker, slide it to the left. One of the most common mistakes I see students make is skipping setting their exposure at this point in the rendering process, which inevitably leads them down a much more difficult road, wasting a ton of time adding unnecessary lights trying to force things to work. So set your exposure now, and your future self will definitely thank you!
3) Add your Fill Light
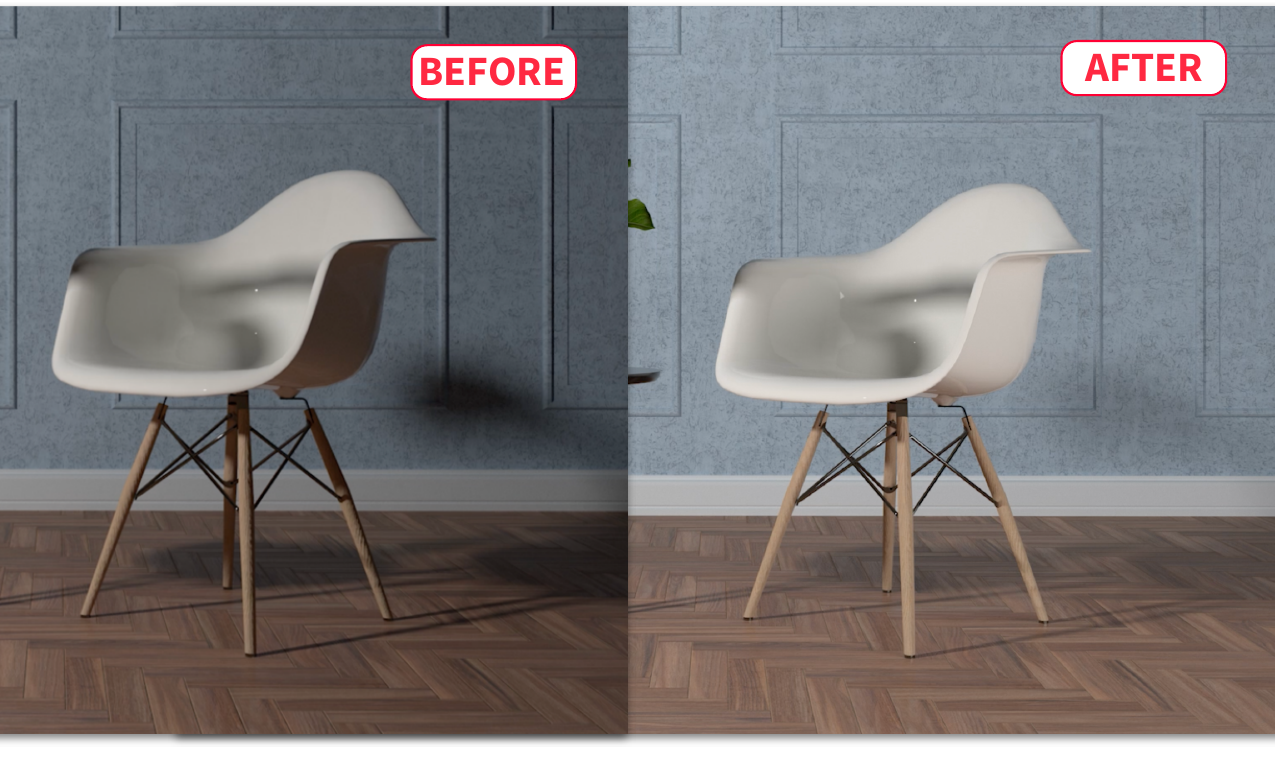
This secondary, or “Fill Light” should be used to help fill-in anything that’s too dark or falls in shadow — helping you bring out important details.
As a good starting point, try placing your fill light at roughly 90 degrees relative to the Key Light, with your camera being in-between the two lights. Again, directional lights like Spotlights and Rectangle Lights work well here.
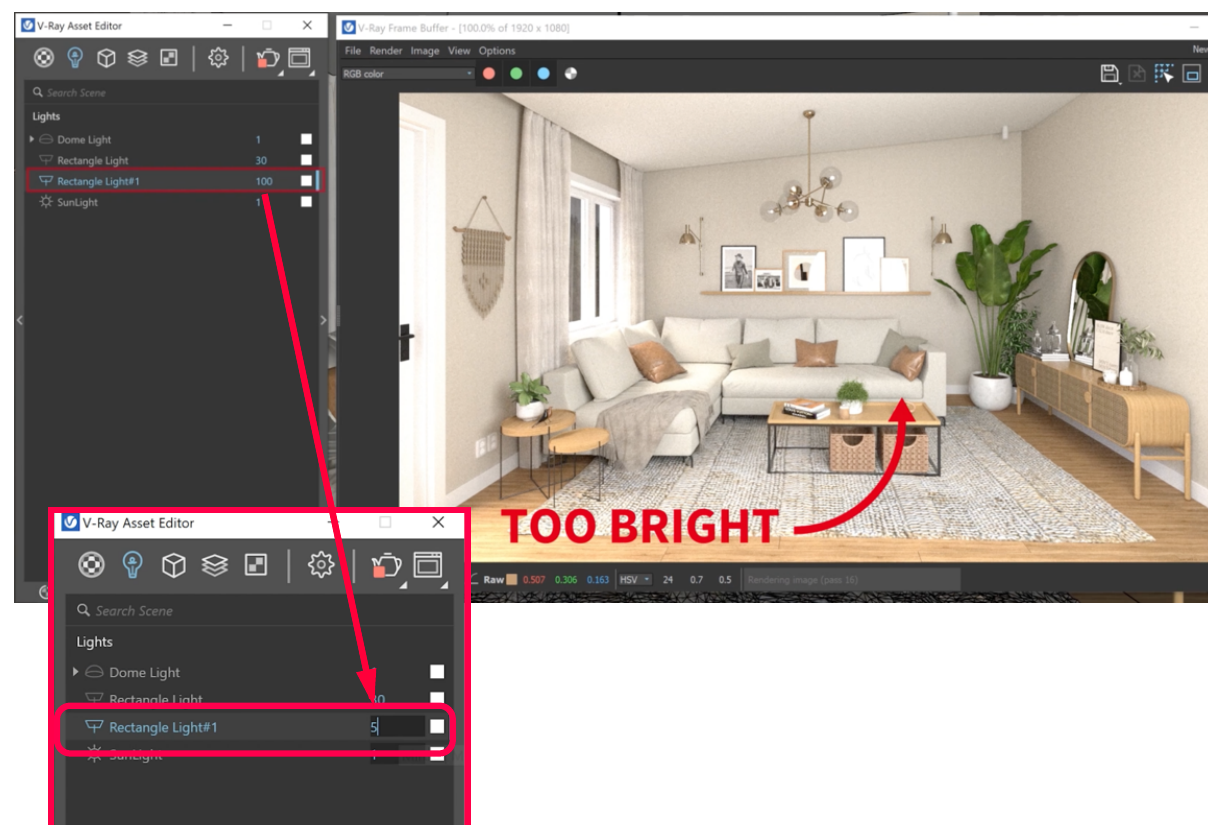
4) Balance the Key & Fill
Once you’ve added the Fill Light, you’ll often find that you need to adjust either the color or brightness of one of your lights to balance it relative to the other.
Since you’ve exposed your camera to the Key Light back in step two, you should start by making adjustments to the Fill Light first.
Because the Fill Light is being used to bring up darker areas that fall into shadow from the Key Light, in general you’ll want it to be set dimmer relative to the Key. It’s also usually best to use a softer light for the Fill.
5) Setup your Light Fixtures
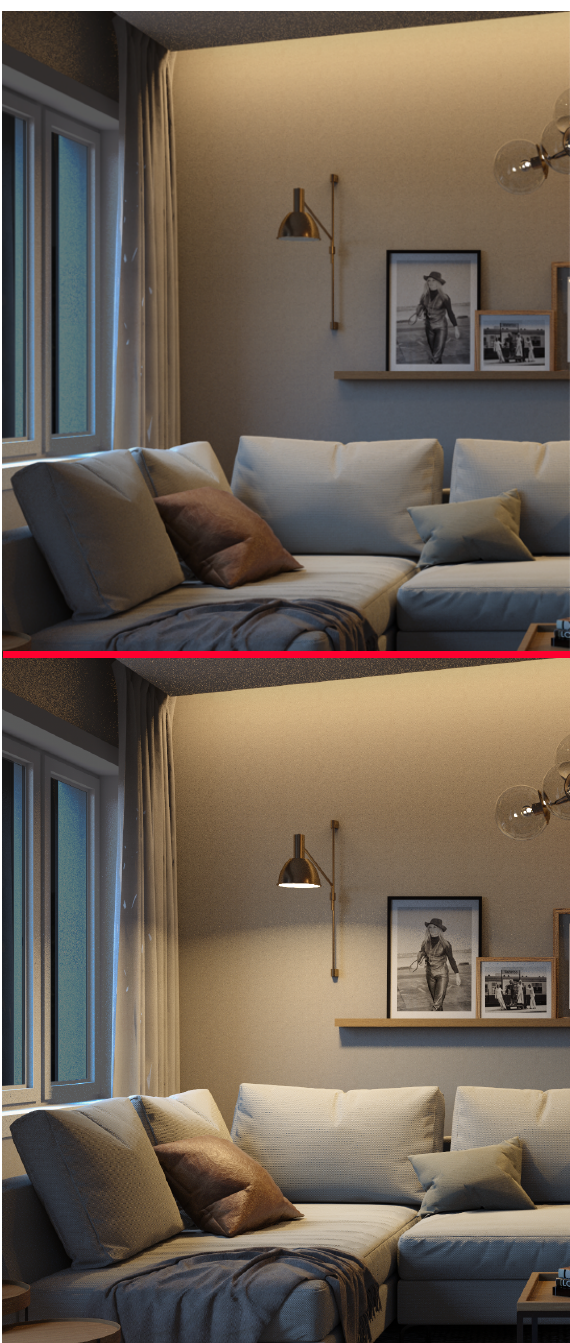
After you’ve setup the Key and Fill lights, it’s time to work on any additional lights that are visible in your rendering, like any light fixtures or bulbs.
Now, which lights you do turn “on” or “off” for your rendering will be a judgement call you have to make based on the look you’re going for.
As a general rule of thumb, it looks nice to have fixtures “on” in daytime interior shots, but outdoor lights don’t need to be on for daytime exteriors. And you’ll usually want all your fixtures on for dusk or night shots.
One important thing to keep in mind as you do add more lights to the fixtures in your scene — is that the more lights you add, the more it will slow down your render times. And you’ll also need to remember to balance each light against your main 2-point lighting set-up.
#3 Enhance Your Final Image
When rendering with V-Ray, you have 3 powerful ways you can adjust the image after rendering it:
1) Light Mix
Light Mix is a feature that was introduced in V-Ray 5. It allows you to control the visibility, brightness and color of your lights after you’ve rendered your image. Not only can you use this tool to balance your lights after the fact, you can create entirely different lighting — even going from something that looks more like a daytime rendering to a nighttime version - all without having to re-render! To use Light Mix, follow these steps:
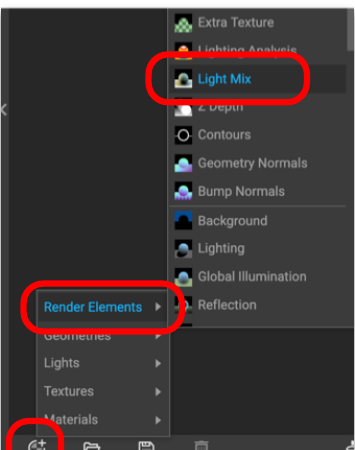
- In the V-Ray Asset Editor, click on the lower left Create Asset icon, then click on Render Elements > Light Mix. This adds the Light Mix Render Element so that you can access Light Mix after you render.
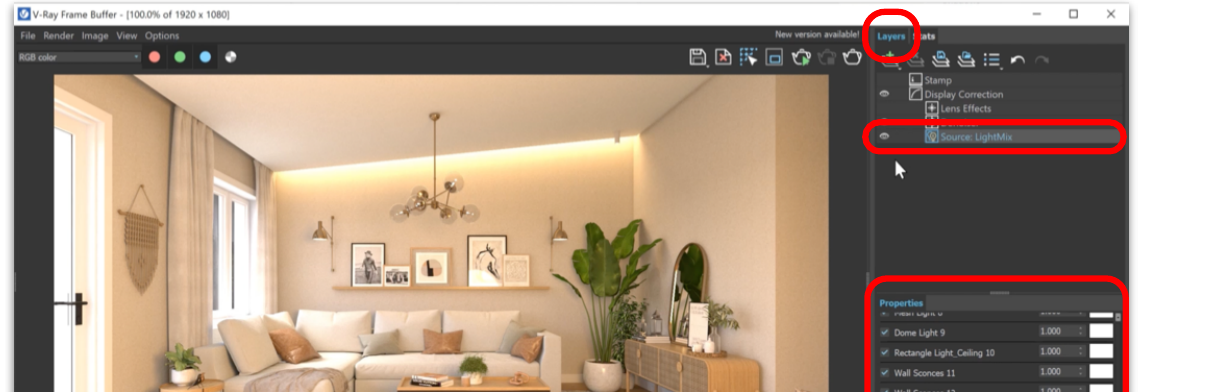
- After you render your image, in the V-Ray Frame Buffer, in the Layers tab, click on Light Mix
- Under Properties you’ll see a list of the lights in your scene along with the ability to change their power, color and visibility.
2) V-Ray Frame Buffer
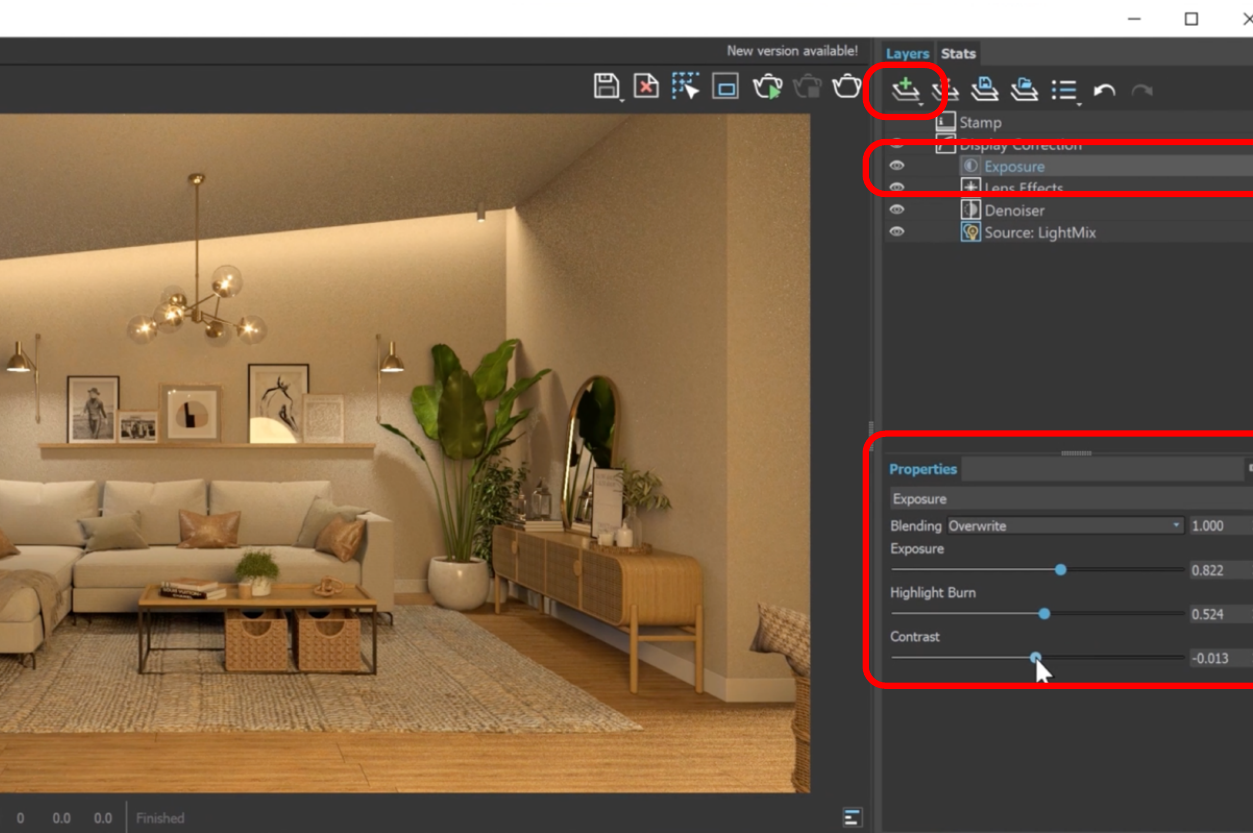
The second way to make adjustments is using the powerful new Frame Buffer in V-Ray 5 — including color corrections, combining render elements and even using blend modes all without needing to use another application like Photoshop. To make enhancements using the Frame Buffer, follow these steps:
- Click on the New Layer icon and pick from one of the options (e.g., “Exposure”)
- Under the Layers tab, click on the name of the option you chose (e.g., “Exposure”)
- Under the Properties tab, make the necessary adjustments
3) Photoshop
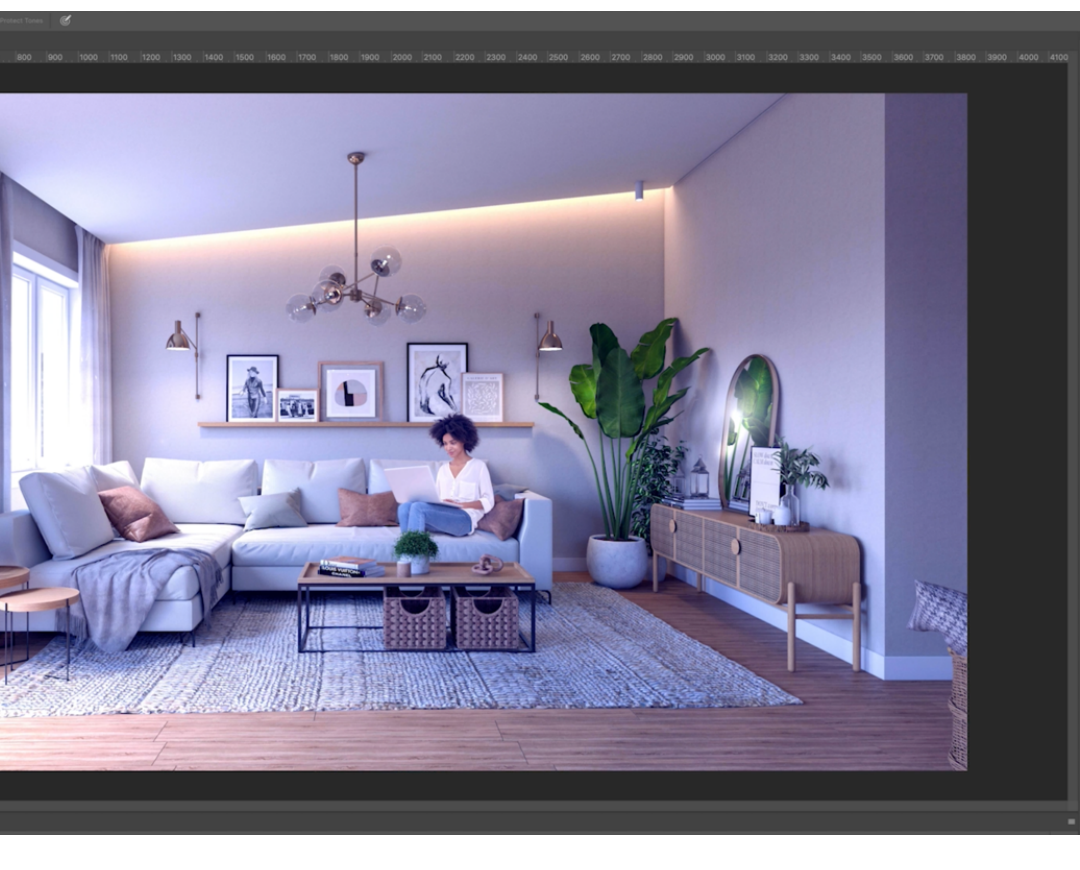
V-Ray’s new features are really powerful, and for some they’ll be all that’s needed.
But they still fall short of some of the things you can do with Photoshop to enhance your final image - for example you can do things like add additional imagery or cutouts to your scene; paint lighting, materials, or effects; and filter, crop, or make adjustments to the entire image.
If you want to learn more about enhancing your image in Photoshop, you can check out our Rendering with Photoshop course in our Video Course Library.
YOUR NEXT STEPS
We hope our The Secret to Better Renderings in V-Ray for SketchUp video and these notes have gotten you started down the right path.
From here, it’s definitely possible to learn everything on your own. But if you don’t have the time to figure out what you need to know, and you can’t afford to pick up bad habits, we recommend checking out our Video Course Library.
It’s filled with $8700 worth of SketchUp training exclusively for professionals — including our V-Ray for SketchUp courses.